April 25, 2024, 01:50:27 PM

Show Posts

This section allows you to view all posts made by this member. Note that you can only see posts made in areas you currently have access to.


Topics - Jak (ripened peach)

Pages: [1] 2 3 4
1
Announcements / Please welcome Giselle!
« on: October 19, 2013, 04:21:27 PM »
I'd like everyone to please extend a warm welcome to Giselle. You may have noticed her here answering threads or doing tech support via the help desk. In addition to this, she is also a programmer\artist, and has been instrumental in getting this latest update and add-on out the door, as well as cleaning up and reviving this forum.

Due to issues beyond control, my ability to work on the sim in the way I would like to has waned over the past year, so Giselle came on board and learned how the whole thing works. A large part of this latest update was her doing, and I know she is excited about the future of Sex Sim. I trust her to do well by it.  :)

So, please do say hello when you can. She'll be almost fully in charge of the next update and I know she'll appreciate your support.

I want to thank you all for being such a fantastic community. I never would have guessed that Sex Sim would get this far, and it has been a pleasure working with you all to make it so.
 :cheers:

2
General Discussion / Just a heads-up!
« on: September 06, 2013, 02:18:58 PM »
Hey everyone, I just wanted to let you know that I am working hard on this next update and I hope to have it out really soon. :)

3
Suggestions / This section is back from the dead!
« on: September 06, 2013, 02:00:51 PM »
As some of you remember, a few of the forum sections had to be taken down quite some time ago due to spam and other problems. I've decided to put them back online now. Have fun. :)

4
General Discussion / This section is back from the dead!
« on: September 06, 2013, 02:00:34 PM »
As some of you remember, a few of the forum sections had to be taken down quite some time ago due to spam and other problems. I've decided to put them back online now. Have fun. :)

5
How to make things for Sex Sim / Artists References...
« on: May 19, 2012, 02:29:28 PM »
I just found this site with some free artist references.  Anyone making characters, etc. might want to check it out as you can also get a whole free set just for posting the links.

Here it is: http://www.artist-reference.com

6
Characters / New place for characters - Please Read!
« on: February 26, 2012, 06:59:18 PM »
I've just finalized the latest addition to the Sex Sim web site, and now user creations can be seen in the regular add-ons shop instead of here in the forum.  User Created Characters can be seen here.

If you are a character creator please consider submitting your characters to the new section.  It works the same way as before if you're using the Character Editor, but now instead of giving you code to place in the forum, when you click "Share Character" in the Editor (after packing it) it will open the new submission form on the site.

I look forward to seeing all of your awesome characters soon.

7
How to make things for Sex Sim / How to use the Character Editor
« on: February 03, 2012, 01:29:04 PM »
The Character Editor is an add-on for Sex Sim, available here.

Using the Character Editor:

To start the Character Editor simply select any one of your female characters in the main "Girls" tab of Sex Sim, then click the "Editor" tab underneath the selection grid.  (*If you don't see the Editor tab, make sure you have purchased the add-on.)  This will take you into the Character Editor interface.

General character creation method:

Before we go over the various sections of the editor, let's talk about how a character would normally be created.

To create an entirely new character, you will still have to start with an existing one.  Don't worry, you can change every single thing about the new character so it's not at all like the one you started with, but there are a few things to keep in mind.  If you're going to create a dark skinned character, it's best to start with one that's already dark skinned.  Same for a light skinned character.  This will prevent you from having to load in custom textures or set custom body colors if you didn't plan to do that.

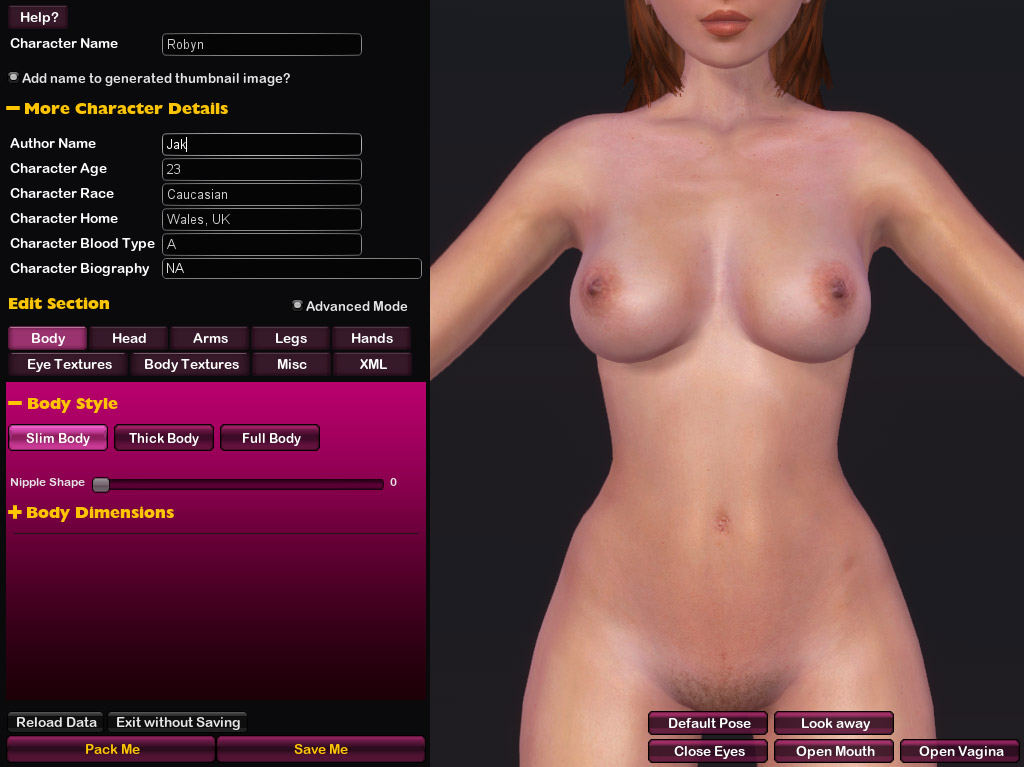
So let's say we want to create a light skinned character, and we decide to use Robyn as the base.  Click Robyn in the main menu and then enter the editor.

The first thing you want to do once you're in the editor is to change the name of the character.  This way you can save your changes as you go, try out the new character in the sim, and go back and forth into the editor as you tweak her to perfection.

The character editor doesn't have any options for setting hair style, pubic hair, or breast shape, as those are already handled through the Hair Styler add-on, the Pubic Hair add-on, and the Breast Shaper add-on.  So after changing the name of the character just click the "Save Me" button at the bottom of the screen and it will take you back to the main menu.  It is now that you can go in and change the hair style, pubic hair, and breast style for that new character.  Once you've done that, head back into the Editor.

Sharing your character:

Once you're finished making the character look how you want her to look, you can save her and she's good to go.  What's even more fun, though, is to share that character with other users.  The Character Editor makes this very easy to do.  Load up the character in the Editor and look at the bottom for the "Pack Me" button.  No, that's not a sexual joke (dirty minds, we all have one), it is there to pack up your character for distribution.

The "Pack Me" button zips up your whole character into a zip file and stores it in a special folder in your Sex Sim directory.  This is the file you will share with other users.  Right after it completes the zip making process you'll be presented with two buttons.  The first one, the one that says "Share this Character?" is the one you want.  Click that button and you'll be taken to a page on the Sex Sim web site with full directions on how to share the character.  It even gives you a block of text you can use to put directly into a post here in the forum that explains what items if any are required for using the character (hair styles, etc.)

Reloading data:

If you're in the middle of editing and realize you need to back up, then just hit the "Reload Data" button to reload the last saved version of the character.

Removing a character:

Sometimes you have a character or two that you just don't care for anymore.  This can happen when doing a lot of editing as well, where you end up with several test characters.  Just go into the Editor and look for the "Remove Me" button.  Click that, click the "Sure" checkbox on the next screen, and hit OK.  Whoosh, the character is gone (it may take a few seconds to complete the process, and then you will be returned to the main menu).

Note that original Ripened Peach characters (ones you get from our add-ons store) can't be deleted.


The Character Editor Interface:

Each of the buttons in the "Edit Section" bar leads to a different area of editing.  We'll cover each in turn.  For the purposes of this tutorial please tick the "Advanced Mode" checkbox once you're in the interface.  You will notice + and - symbols next to various sections.  Clicking these will toggle a section's visibility.
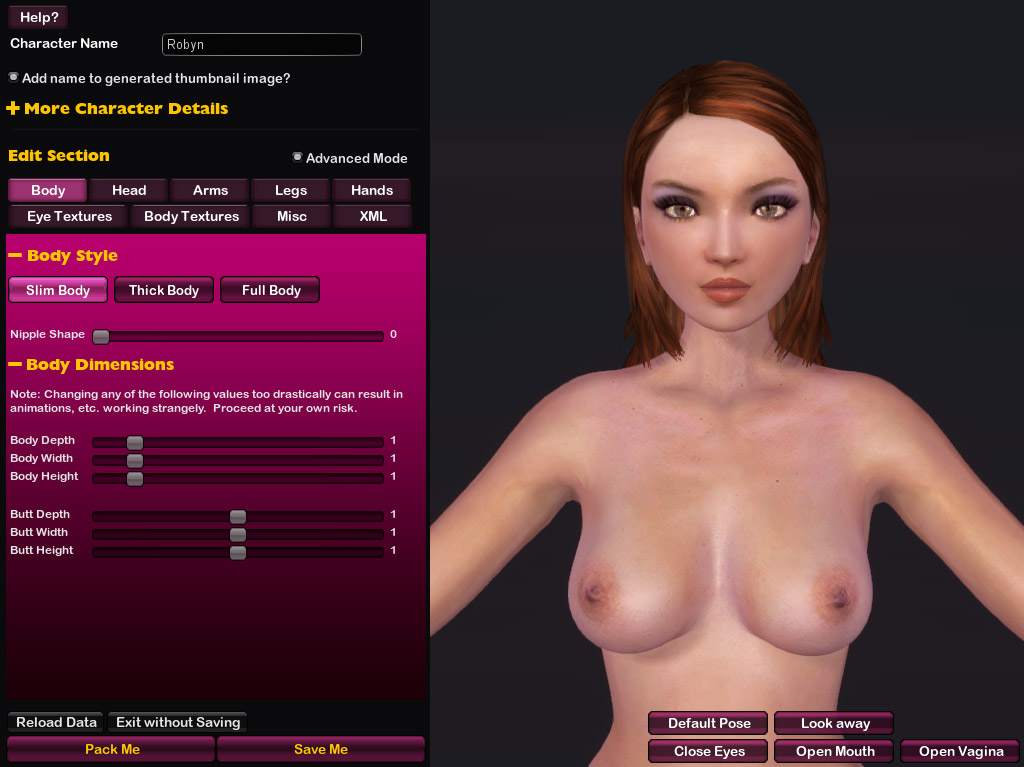
Body Section:


It is here where you can decide what body type the character will have, and while in Advanced Mode you can also fine-tune the body dimensions.

The "Body" section is also where you can use the nipple shape slider, which allows to to choose a range from default to puffy nipples to long nipples.  If your girl is clothed when you enter the editor, this slider will be disabled, so make sure to go nude before editing if that's important to you.
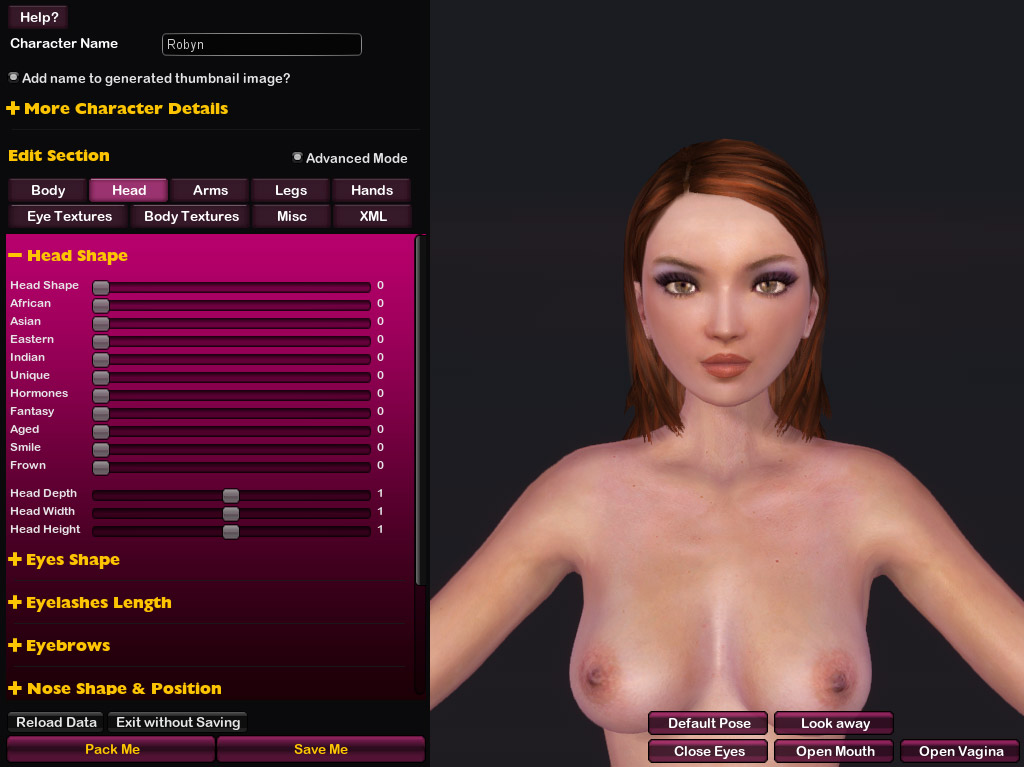
Head Section:


The "Head" section is where you will find the most bang for your buck as far as editing characters goes.  By changing the head shape in various ways, you have access to a virtually infinite combinations of looks.

Arms, Legs, and Hands Sections:

The "Arms", "Legs", and "Hands" sections allow you to edit those respective parts of the body.  As with the other sections, most of it is self-explanatory, so feel free to have fun and experiment.

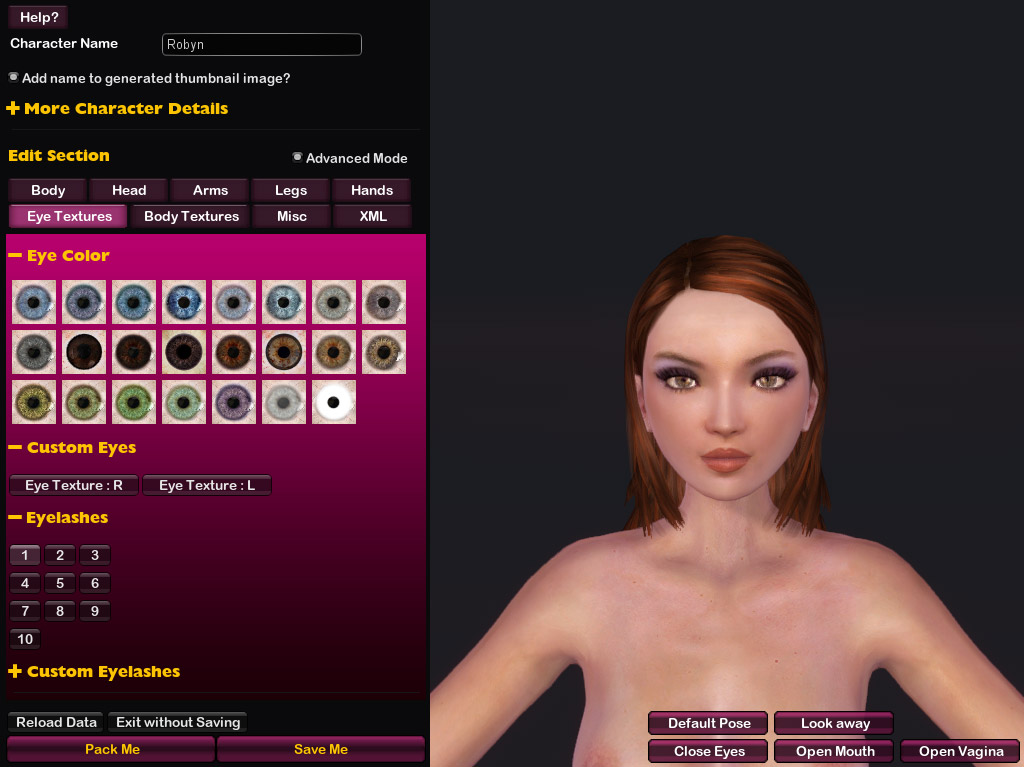
Eye Textures Section:


In the "Eye Textures" section you can choose eye colors from a number of pre-set styles, or for true customization load in your own textures.  Textures can be in JPG or PNG format and by using custom eyes you can even have a different texture for each eye, if you like.

Eyelashes work the same way.  Choose from the pre-sets or load your own custom eyelashes texture.  Custom eyelash textures should be in PNG format as they must contain transparency to work properly.

Body Textures Section:


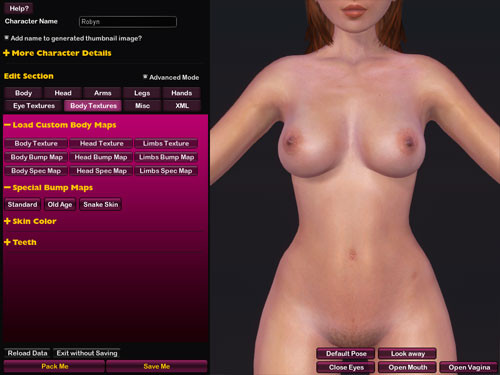
The "Body Textures" section is where advanced character creators will thrive.  This is where you can load your own custom textures for a character, and textures can make all the difference in the world.

Each of the body maps you load can be in JPG or PNG format.

The "Texture" buttons load the main (or "diffuse" if you're used to working with 3D) texture.  This determines the overall look and color of the skin, face, nipples, etc.

The "Bump Map" buttons allow you to load "normal maps", which will add bumps and extra detail to the character.  You can create normal maps in any advanced graphic editing program or right here online and load them directly into the Character Editor.

The "Spec Map" buttons are for loading specularity maps, which are black and white images that control the appearance of light as it falls on the character.  Feel free to experiment with various images to see how they affect the lighting.  If you hit the "G" key while in the editor you can toggle the "wet look" skin which helps even more when tweaking your specularity maps.

Note: Each of those button sets have three slots, one for body, one for head, and one for limbs.  If you decide to use custom textures you will need to load all three of those slots with a texture, otherwise you will have areas that are completely white.  In other words, when you load a custom texture into a slot you will need to load the other slots as well.

The "Special Bump Maps" buttons give you a choice of three presets to choose from if you don't want to make your own bump maps.

Please see the "Resources" section at the bottom of this tutorial for links to UV maps, base character textures, etc.

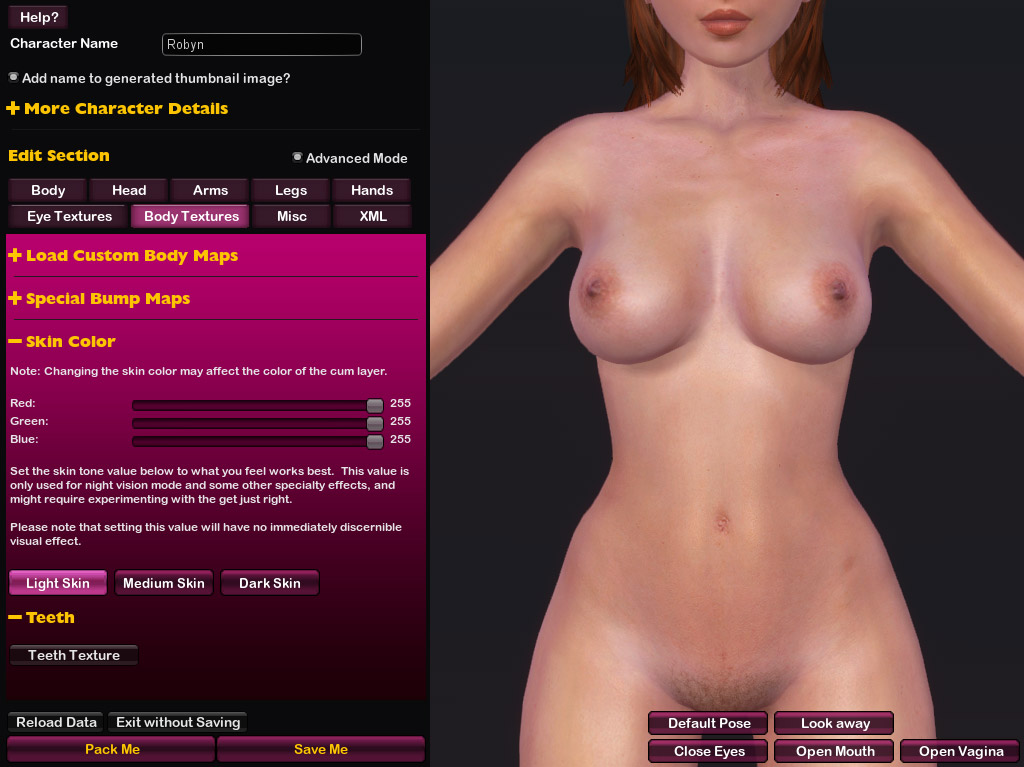
Body Textures Section Part 2:


Continuing with the "Body Textures" section, if you expand the "Skin Color" tab you will see three sliders for setting the overall skin tone.  Each of the sliders represents a value of the RGB spectrum and between the three you have the ability to choose from over 16 million colors.

Below the sliders you will see a set of skin tone buttons that may be slightly confusing at first.  In some of the new visual effects available in Sex Sim, such as night vision, the sim tries to determine how best to achieve the effect to work with certain skin tones.  By choosing one of the skin tone buttons in this section you can help things along and get the effect you personally choose rather than having the sim do it for you.  When you click these buttons you will see nothing happen, and that's normal.  The results are only visible when using one of the special effects in the sim.

Below that you will see a button that allows you to load custom teeth textures.  Most people will never need this as the default teeth seem to work fine, but if you find yourself wanting something a little different then this is your button.  Teeth should be in PNG format with transparency for the best effect.

Again, please see the "Resources" section at the bottom of this tutorial for links to UV maps, base character textures, etc.

Misc Section:


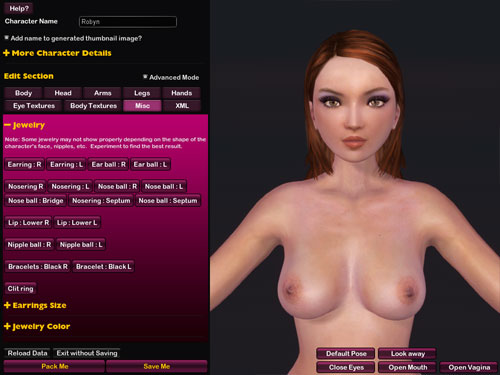
The "Misc" section is where you can work on some of the extra items available for customization.  Currently this means jewelry, but there may be more items available in the future that will appear in this section.

By clicking any of the jewelry buttons you can add that jewelry to the character.  Please note that sometimes jewelry may not show up properly, depending on how you've shaped your character's head.  For instance, if you have enlarged the nose past a certain point, then the nose ring won't show up.  I plan to improve this limitation in the future but for now just keep it in mind.

You'll also find the ability to control the "Earrings Size" and overall jewelry color in this section.  The jewelry color works with sliders, exactly like the Body Color.

More Character Details Section:


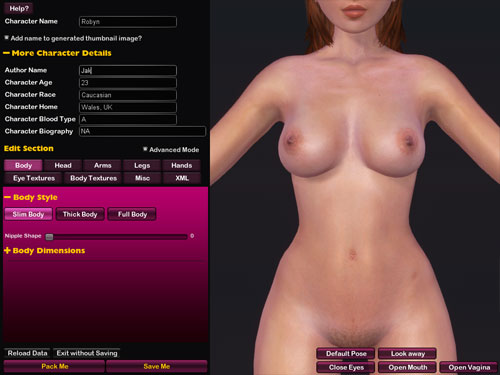
At the top of the editor, directly under the character's name field, you will see the "More Character Details" tab.  Expanding that tab will give you access to various details for your character.  Feel free to fill them in as you wish.


Additional Notes and Resources:

ReadMe Files:

When sharing characters, you might want to include a text file with information about that character.  There is a way to do it so that the "Pack Me" option will automatically include this text file in the zip for the character.  Simply create your text file and save it in the "Sex Sim\Runtime\user_created\characters\readme_files\" folder using the following naming convention:

f-name of character.author.README.txt -- don't forget the periods (full stops) in there.

An example would be"f-Kathy.Jak.README.txt" - So I put that file into the read_me folder and it ends up going into the zip file when the character is packed.  When someone uses a character that has one of these readme files a little note icon will appear on the character window, which can be clicked to view the file.

Texture Resources:

Bump maps (normal maps): You can create them in any advanced graphic editing program or better yet make them right here online.

Base character textures: Sex-Sim_Female_Base_Textures.zip

Each file has a few layers, including makeup, etc. so you can have something to work with as you make your own textures.  I tested each file in Photoshop and GIMP.

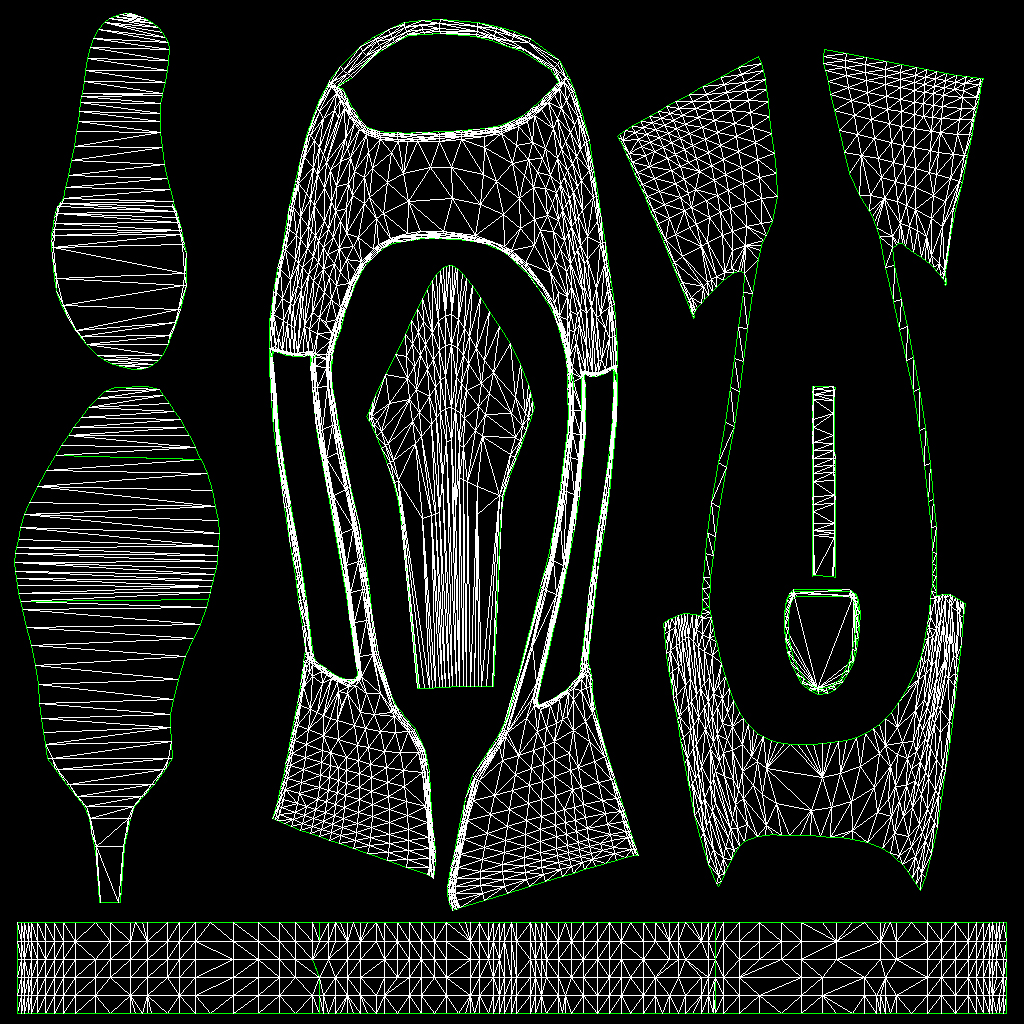
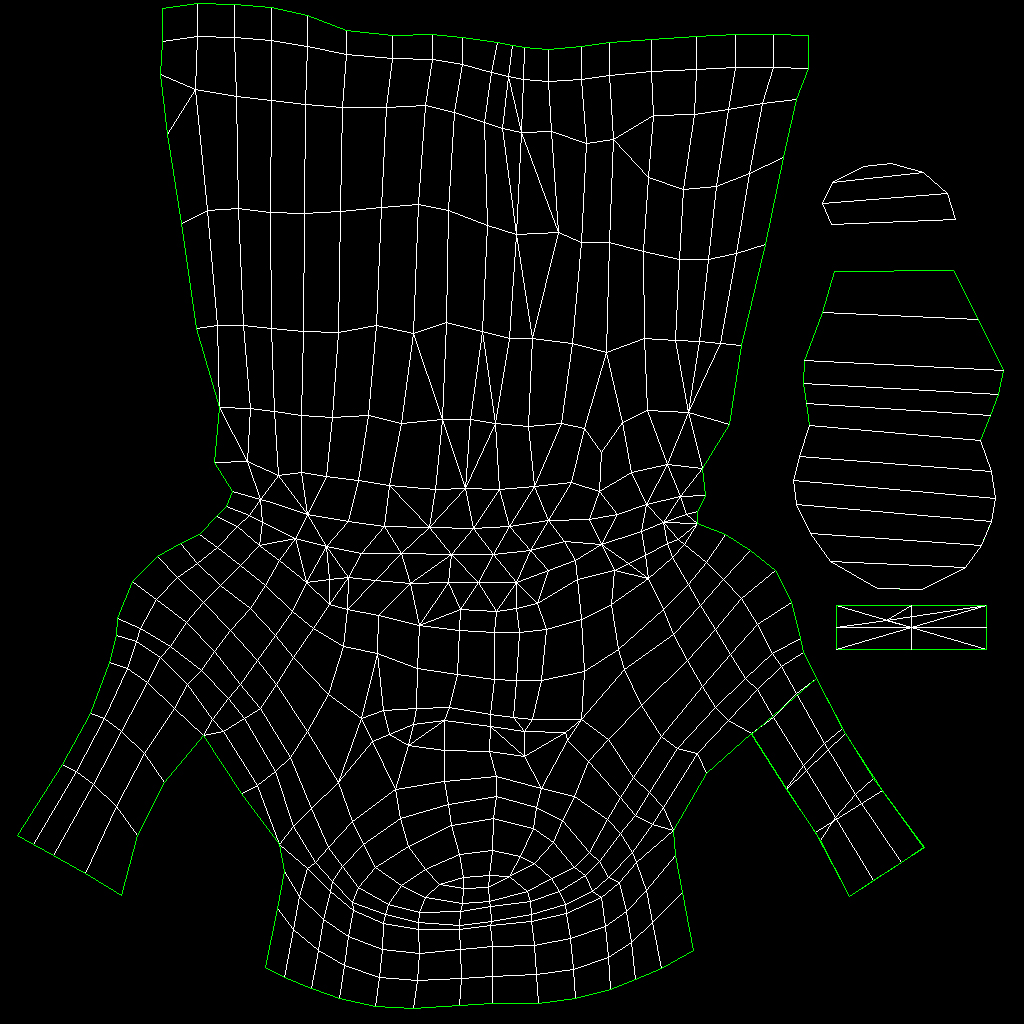
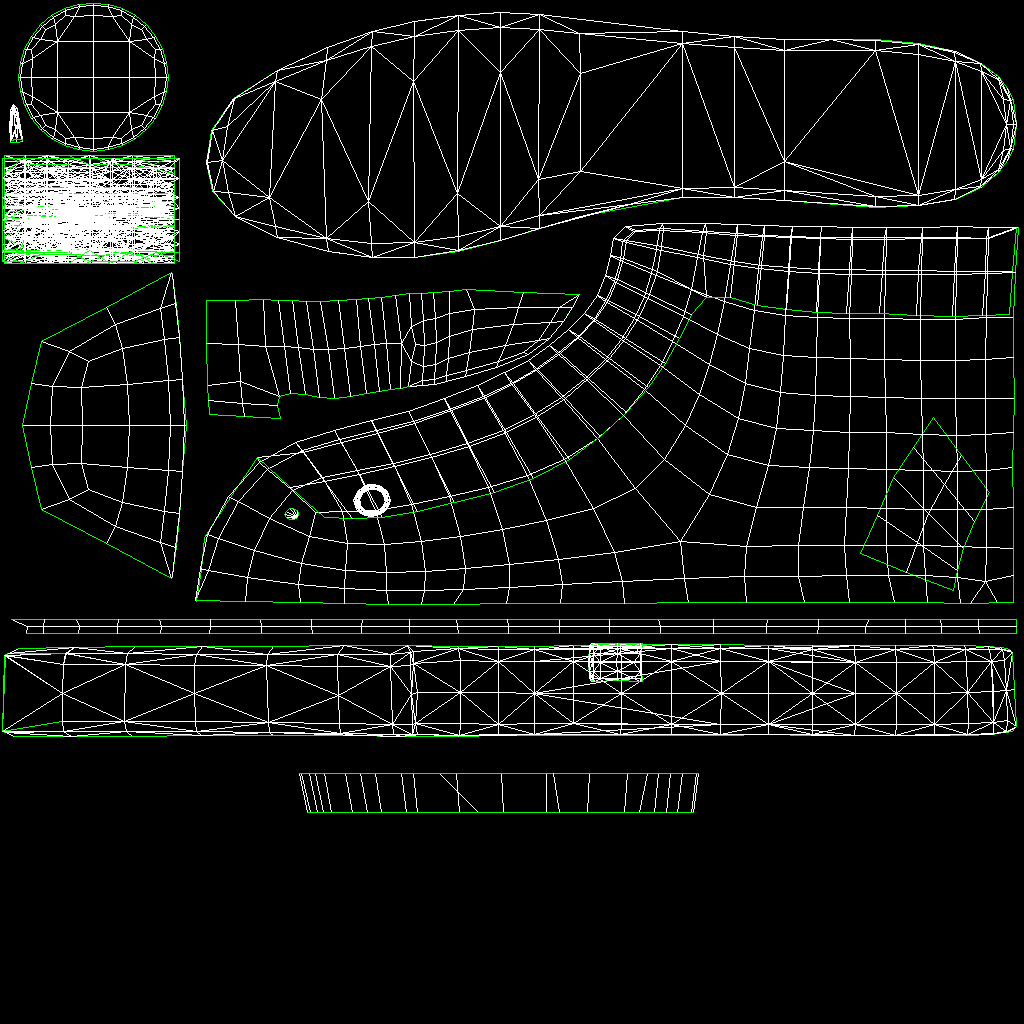
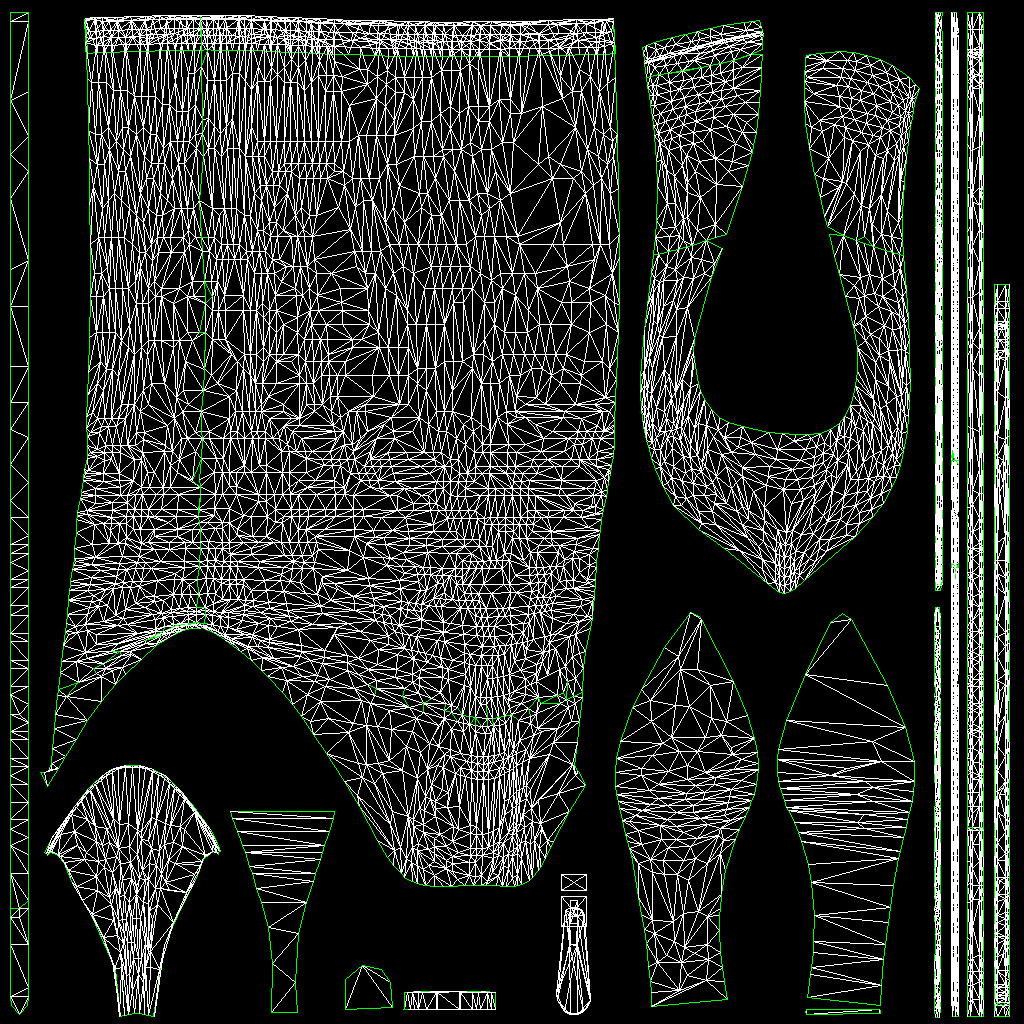
Female Character UVW maps: SexSim-Female-UVW.zip

This is a zip file which contains all of the UVW maps in PNG transparent format, making it easy to put into a layer in your graphic editing application.

Each map is labeled with the appropriate parts so it should be easy enough to figure out what's going on.

When we created Sex Sim we decided it might be a good idea to use a UVW mapping scheme that was very similar to that used for the "Victoria 4" model in Poser.  Since there are so many resources available online for that particular mapping format we figured it would make it an easier process for people working in Poser to start playing around with Sex Sim.   Our textures have a few distinct changes from the Poser layout, but we kept them fairly close.  If you're not familiar with Poser or Victoria 4 then don't sweat it, but if you are then you will have a head start in knowing how to texture Sex Sim girls.

3D Body Meshes: Sex-Sim_Female_Body_Meshes.zip

If you are comfortable in a 3D editing environment you might want to download this zip file containing the 3D model meshes for each of the currently existing female body types in Sex Sim.  They are in FBX format and have materials set up for HEAD, BODY, LIMBS, etc. making it relatively painless to plot your textures as you create them.

8
Suggestions / What kind of Girls or Guys do you want to see?
« on: November 09, 2011, 07:30:15 PM »
This thread is for suggesting types of girls or guys you'd like to see made for Sex Sim.  Descriptions are good but pictures are even better. :)

9
User Creations / MOVED: A First Attempt.
« on: November 06, 2011, 12:04:45 AM »

10
User Creations / MOVED: Faye, first character
« on: November 06, 2011, 12:04:36 AM »

11
General Discussion / Anyone playing RAGE?
« on: October 12, 2011, 01:58:24 PM »
I've been playing RAGE, the latest game from id Software.  Pretty awesome game, lots of fun.  The character design and animation is really well done, and I noticed on Reddit and the Steam forum that people are already fawning over some of the female characters.

One in particular (Loosum Hagar) has people googly-eyed and I figured there had to be some nude shots out there of her (aren't there always?!) but I didn't find any so I made one (of course).

If you're a Rage fan, enjoy. :)


(click for larger)

12
How to make things for Sex Sim / How to make shoes
« on: October 12, 2011, 10:53:52 AM »
First, you're going to need the Shoes! add-on, so get that in the add-ons shop before following this tutorial.

You will need:
  • GIMP (FREE image editing program from http://www.gimp.org/) or...
  • Photoshop (not required but VERY useful) and...
  • Notepad or a good text editor like TextPad.
Aside from being able to use graphic editing programs you will need to know how to open Windows Explorer and work with files and folders.

Ok, let's do it...

Misc Files:

There are three files that every pair of shoes needs.

1. The shoes texture.  This is the main texture that determines what your shoes look like.

2. An info file.  This is a text file with an XML extension.  Here's an example:

Code: [Select]
<?xml version="1.0" encoding="UTF-8" ?>
<Unit>
<Shoes>
<Name>Black Peekaboo</Name>
<Description>NA</Description>
<Author>Ripened Peach</Author>

<Category>shoes</Category>
<Type>1</Type>

<Shine>3</Shine>

<HeightOffset>0.08</HeightOffset>
</Shoes>
</Unit>

The info file has what are called "tags" and each tag has a purpose.  To use a tag you just put whatever info it needs in between the > and the <.  The breakdown of what each tag is for is:

  • <Category> : This is the category the layer item appears in in the Extras menu.  In this case it is of course "shoes"
  • <Author> : This is you.
  • <Type> : This is the style of shoe you want to use.  There are currently 5 styles to choose from.
  • <Shine> : This is the type of material surface you want.
  • <HeightOffset> : This is the standing height offset when the girl is wearing these shoes. You won't really need to use this as it's more of an internal value.

3. A thumbnail image.  This is the picture that shows in the shoes menu for picking out the shoes you want.

Painting the Textures:

You can paint your textures in any suitable graphics editing program like Photoshop, Painter, GIMP, whatever you like, as long as it can save out PNG files with transparency.

The wireframe shell model for a shoe uses what's called a UVW map in order to properly place the painted texture on it. 

Here are the UVW maps for each of the five styles of shoe (shoe style shown on thumb for reference):


Shoes Style 1 UVW (click for larger)

Shoes Style 2 UVW (click for larger)

Shoes Style 3 UVW (click for larger)

Shoes Style 4 UVW (click for larger)

Shoes Style 5 UVW (click for larger)

You will want to download the larger version of the UVW image as it will make texture painting much easier.  You can load it into a layer in your paint program and use it as a template to work with.

Please load some of the existing shoe textures into your image editing program to get an idea of how they work.  That will give you a good idea of where everything goes on each texture.

Setting the Material Type:

You can choose from 4 different material types for your shoes to use.  Just put the number from below between the "Shine" tags in the XML file:

0. Matte
1. Semi Shiny
2. Shiny
3. Super Shiny

Shoe types 1 and 5 have an additional material type, "Snakeskin", which can be used by entering '4' into the Shine tags.  This will only work on shoe types 1 and 5, though, and gives them a snakeskin bump map.

So for example, let's say I want super shiny shoes, then the Shine tags would look like this:

<Shine>3</Shine>

Where to put stuff:

Ok, so you've got your textures painted and you want to see them in the sim.

Here's where it all goes:

The shoe texture: Runtime\user_created\shoes\
The info XML file: Runtime\user_created\shoes\info\
The thumbnail image: Runtime\user_created\shoes\thumbs\ (the thumbnails need a "tn_" in the beginning of the filename - see the ones that come with the pack for details).

When you name the files, you might want to put your nick name or some tag in the file name like this: jak_Awesome-Shoes.xml - That way if you make something that has the same name as one someone else made, they won't over-write each other.

Make sure those files are in those folders and then start the sim.   Log in and go to the Extras\Shoes tab.  You should be able to find your shoes in there.  Click them and check it out!

Some Tips:

You most likely will have to keep checking your progress as you go, and there's no need to keep logging in and out of Sex Sim to do it.  Just hit Go to see the shoes on the girl, do some work in your graphics editing program, save the textures, then hit ESCAPE to go back to the main menu.  Your new textures will load up when you choose your shoes again (you might have to click on another item then yours again to reset it).

Another way to quickly see what you're working on is to use the new TAB viewer.  Click the Girls tab on the menu, then hit the TAB key on your keyboard.  That method may be quicker than dipping in and out of the sim.

An easy way to work on shoes is to create a file called "TempShoes" in Photoshop or whatever.  Then, copy one of the existing shoes' xml info files and rename it to "TempShoes.xml".  Now, when you save your PNG file while working, save it as "TempShoes.png" and that will be your working file.  There's no need to even make a thumbnail just yet as Sex Sim will just use a default one until you do.  When you're finished working then just save things as normal to the name you want and that's that.  That way you always have a quick way to just jump in and start working on new shoes without having to keep making the initial files all the time.

13
General Discussion / Rest in Peace Steve Jobs.
« on: October 05, 2011, 07:29:53 PM »
Steve Jobs passed away today.  Wow.

14
How to make things for Sex Sim / How to make a new character - Part 1
« on: October 02, 2011, 11:23:19 AM »
Note: The following information is out of date with the introduction of the new Character Editor but will be left here for reference.  Please see this thread for more up-to-date info.


I'm making this thread to organize the instructions for the process of making new characters for Sex Sim.  There are several threads here in this section that deal with various parts and this thread will attempt to tie it all together to make sense.

1. Set up the character's XML file

Every character in Sex Sim is set up with their own individual information file, which is in XML format.  You don't need to have any special editors to work with an XML file, nor do you need to necessarily know what an XML file is, but just know that it's a special text file set up in a certain way.

When you want to create a new character, the first thing to do is choose one of the XML files for an existing character and go from there.  To do that, choose one of the characters you already have, let's say Robyn (everyone has her).

1. You'll need to use Windows Explorer to find Robyn's XML file.  It's located in your main Sex Sim directory inside the Sex Sim\Runtime\_aData\characters\ folder.  Look for a file named "f-Robyn.xml".  That's Robyn's info file. 

2. Copy Robyn's XML file by right clicking it and choosing "Copy".  Next, find you way into the Sex Sim\Runtime\user_created\characters\.  Notice the difference in paths.  One has "_aData" which is where all of the official files go, and the other has "user_created", which is where everything that you create will go.  Paste the file into that folder, then rename it to something like "f-Betty.xml" or whatever your character's name will be.

3. Next you'll need to open the file up in NotePad or some other text editor.  I use TextPad or UltraEdit depending on what I'm working on, but any good text editor will do.

4. Now it's time to edit the character's attributes.  See this thread for detailed info on this process.

5. Once you've edited the attributes you can save the file and start Sex Sim.  You should see your new character in the character select screen.

6. To make a thumbnail image for your character, you need a 190x190 pixel image in PNG format.  Save it in the Sex Sim\Runtime\user_created\characters\thumbs\ folder as "tn_f_Betty.png", replacing "Betty" with the name of your character.  Make sure to edit the XML file (see above) to let it know which thumbnail image to use.  Now when you look in Sex Sim you'll see your character along with her custom thumbnail image.


2. Using Custom Textures

1. The above instructions tell you how to change the physical attributes of a new character, but you can also use your own character textures to truly make her your own.  See this thread for full info on how to do that.


3. Misc. Ideas

1.  Breast editing: See this thread.

2.  Pubic hair editing: See this thread.

3. See the rest of this section of the forum for more tips, guides, etc.

15
How to make things for Sex Sim / MOVED: Post Scriptum: Veronica
« on: September 22, 2011, 08:56:38 PM »

Pages: [1] 2 3 4
SMF spam blocked by CleanTalk