16
May 09, 2024, 11:47:50 AM
 Show Posts
This section allows you to view all posts made by this member. Note that you can only see posts made in areas you currently have access to.
17
How to make things for Sex Sim / Hair Styles for Characters : XML Specs
« on: March 24, 2011, 10:52:25 PM »
This info is covered in the XML Specs thread but I thought I'd make a thread for just this alone so it's more clear.
To change hair on a character, open their XML file and look for the <Hair> tag. Then use one of the following (the part before the parenthesis) to set the hair style. For instance, to use Kendra's hairstyle you would set the tag line to: <Hair>punky</Hair>
Female Hair:
messy (Alison)
punky (Kendra)
pixie (Layla)
glamour (Robyn)
feathered (Ulani)
glamour-mixed (Shauna)
short_messy (Tiffany)
updo (Ayumi)
bop (Catt)
secretary (Vanessa - without glasses)
secretary_w_glasses (Vanessa - with glasses)
night_out (Samantha)
angel (Joanne)
none (bald)
Male Hair:
short_mussed (Alec)
none (Tai)
18
How to make things for Sex Sim / How to make stockings
« on: March 11, 2011, 09:11:58 PM »
First, you're going to need the Stocking Layers add-on, so get that in the add-ons shop before following this tutorial.
This will be a short tutorial with the basics and I'll fill in more over time. Right now I just want to get this out there so you guys know how to use this new add-on.
You will need:
Ok, let's do it...
Misc Files:
There are three files that every stockings item needs.
1. The stockings layer texture. This is the main texture that determines what your stockings layer looks like.
2. An info file. This is a text file with an XML extension. Here's an example:
The info file has what are called "tags" and each tag has a purpose. To use a tag you just put whatever info it needs in between the > and the <. The breakdown of what each tag is for is:
3. A thumbnail image. This is the picture that shows in the Extras menu for picking out the stockings.
Painting the Textures:
You can paint your textures in any suitable graphics editing program like Photoshop, Painter, GIMP, whatever you like, as long as it can save out PNG files with transparency.
The wireframe shell model for the stockings layer uses what's called a UVW map in order to properly place the painted texture on it. Here is what that looks like:
You will want to download the larger version of the image as it will make texture painting much easier. You can load it into a layer in your paint program and use it as a template to work with.
Please load some of the existing stocking layer textures into your image editing program to get an idea of how they work. You'll notice that they utilize transparency to the fullest extent, so you can achieve just about any effect you can imagine . When you save your textures as PNG you will need to save them with the background layer turned off so that only the stockings part you want is showing and everything that needs to be transparent isn't.
Where to put stuff:
Ok, so you've got your textures painted and you want to see them in the sim.
Here's where it all goes:
The info XML file: Runtime\user_created\legs-arms\info\
The stockings layer texture: Runtime\user_created\legs-arms\
The thumbnail image: Runtime\user_created\legs-arms\thumbs\ (the thumbnails need a "tn_" in the beginning of the filename - see the ones that come with the pack for details).
When you name the files, you might want to put your nick name or some tag in the file name like this: jak_Awesome-Socks.xml - That way if you make something that has the same name as one someone else made, they won't over-write each other.
Make sure those files are in those folders and then start the sim. Log in and go to the Extras tab. You should be able to find your stockings item in there. Click it and check it out!
Some Tips:
You most likely will have to keep checking your progress as you go, and there's no need to keep logging in and out of Sex Sim to do it. Just hit Go to see the outfit on the girl, do some work in your graphics editing program, save the textures, then hit ESCAPE to go back to the main menu. Your new textures will load up when you choose your stockings item again (you might have to click on another item then yours again to reset it).
Another way to quickly see what you're working on is to use the new TAB viewer (new in March 2011). Click the Girls tab on the menu, then hit the TAB key on your keyboard. That method may be quicker than dipping in and out of the sim.
An easy way to work on stockings is to create a file called "TempStockings" in Photoshop or whatever. Then, copy one of the existing stockings xml info files and rename it to "TempStockings.xml". Now, when you save your PNG file while working, save it as "TempStockings.png" and that will be your working file. There's no need to even make a thumbnail just yet as Sex Sim will just use a default one until you do. When you're finished working then just save things as normal to the name you want and that's that. That way you always have a quick way to just jump in and start working on new stockings without having to keep making the initial files all the time.
This will be a short tutorial with the basics and I'll fill in more over time. Right now I just want to get this out there so you guys know how to use this new add-on.
You will need:
- GIMP (FREE image editing program from http://www.gimp.org/)
- Photoshop (not required but VERY useful)
- Notepad or a good text editor like TextPad.
Ok, let's do it...
Misc Files:
There are three files that every stockings item needs.
1. The stockings layer texture. This is the main texture that determines what your stockings layer looks like.
2. An info file. This is a text file with an XML extension. Here's an example:
Code: [Select]
<?xml version="1.0" encoding="UTF-8" ?>
<Unit>
	<Item>
		<Category>limbs</Category>
		<Author>Ripened Peach</Author>
		<Type>Stockings</Type>
	</Item>
</Unit>
The info file has what are called "tags" and each tag has a purpose. To use a tag you just put whatever info it needs in between the > and the <. The breakdown of what each tag is for is:
- <Category> : This is the category the layer item appears in in the Extras menu. It's not really used yet so just keep it as "limbs".
- <Author> : This is you.
- <Type> : This is the type of layer it is. Right now we only have stockings so keep it as "Stockings".
3. A thumbnail image. This is the picture that shows in the Extras menu for picking out the stockings.
Painting the Textures:
You can paint your textures in any suitable graphics editing program like Photoshop, Painter, GIMP, whatever you like, as long as it can save out PNG files with transparency.
The wireframe shell model for the stockings layer uses what's called a UVW map in order to properly place the painted texture on it. Here is what that looks like:
 Stockings shell UVW (click for larger) |
You will want to download the larger version of the image as it will make texture painting much easier. You can load it into a layer in your paint program and use it as a template to work with.
Please load some of the existing stocking layer textures into your image editing program to get an idea of how they work. You'll notice that they utilize transparency to the fullest extent, so you can achieve just about any effect you can imagine . When you save your textures as PNG you will need to save them with the background layer turned off so that only the stockings part you want is showing and everything that needs to be transparent isn't.
Where to put stuff:
Ok, so you've got your textures painted and you want to see them in the sim.
Here's where it all goes:
The info XML file: Runtime\user_created\legs-arms\info\
The stockings layer texture: Runtime\user_created\legs-arms\
The thumbnail image: Runtime\user_created\legs-arms\thumbs\ (the thumbnails need a "tn_" in the beginning of the filename - see the ones that come with the pack for details).
When you name the files, you might want to put your nick name or some tag in the file name like this: jak_Awesome-Socks.xml - That way if you make something that has the same name as one someone else made, they won't over-write each other.
Make sure those files are in those folders and then start the sim. Log in and go to the Extras tab. You should be able to find your stockings item in there. Click it and check it out!
Some Tips:
You most likely will have to keep checking your progress as you go, and there's no need to keep logging in and out of Sex Sim to do it. Just hit Go to see the outfit on the girl, do some work in your graphics editing program, save the textures, then hit ESCAPE to go back to the main menu. Your new textures will load up when you choose your stockings item again (you might have to click on another item then yours again to reset it).
Another way to quickly see what you're working on is to use the new TAB viewer (new in March 2011). Click the Girls tab on the menu, then hit the TAB key on your keyboard. That method may be quicker than dipping in and out of the sim.
An easy way to work on stockings is to create a file called "TempStockings" in Photoshop or whatever. Then, copy one of the existing stockings xml info files and rename it to "TempStockings.xml". Now, when you save your PNG file while working, save it as "TempStockings.png" and that will be your working file. There's no need to even make a thumbnail just yet as Sex Sim will just use a default one until you do. When you're finished working then just save things as normal to the name you want and that's that. That way you always have a quick way to just jump in and start working on new stockings without having to keep making the initial files all the time.
19
Suggestions / What kind of hair styles do you want?
« on: March 09, 2011, 11:06:01 AM »
The title says it all... what kind of hair styles would you like to see in Sex Sim? If you can post pics, even better. 
21
Unofficial Sex Sim Support / Don't hide the Sex Sim folder
« on: March 03, 2011, 05:53:39 PM »
It's been brought to my attention that Sex Sim won't install properly if you have installed it before, and have the folder set to "hidden" mode in Windows, and Windows "show hidden folders " option is checked. You need to set the folder to normal before reinstalling or installing an update.
22
How to make things for Sex Sim / Hints and Tips
« on: March 03, 2011, 12:31:36 AM »
This thread is where people can share various ideas that can help other people with their creations. If you've got some tips that you think will be useful, share them here.
I'll start...
When you're in the main menu and a female character is selected, hit the TAB key to bring up a special view of her. You'll end up with a screen like this:
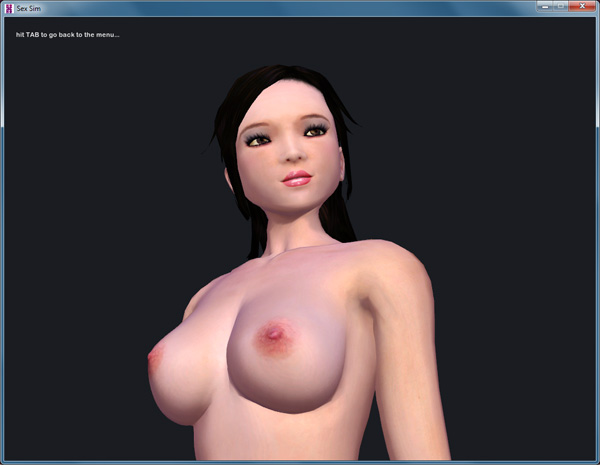
You can move the mouse around to change the view. Use Alt-Print Screen to take a screen shot and then in your graphic editor it's easy to remove the grey background, and then you have a nice screen shot to use for your character thumbnails, etc.
If you use the rotation buttons on the main screen under the girl you can get her head angled how you like just before hitting TAB. Play around with it, you'll see.
A little trick you can use with this is to go to the Options menu and then hit Tab. You will then be in the environment with the girl standing still and you can move the camera around just like in the regular game. This lets you get good screen shots of new clothing, etc. without her moving all over the place.
So there you go. Have fun and let's hear some tips!
I'll start...
When you're in the main menu and a female character is selected, hit the TAB key to bring up a special view of her. You'll end up with a screen like this:
You can move the mouse around to change the view. Use Alt-Print Screen to take a screen shot and then in your graphic editor it's easy to remove the grey background, and then you have a nice screen shot to use for your character thumbnails, etc.
If you use the rotation buttons on the main screen under the girl you can get her head angled how you like just before hitting TAB. Play around with it, you'll see.
A little trick you can use with this is to go to the Options menu and then hit Tab. You will then be in the environment with the girl standing still and you can move the camera around just like in the regular game. This lets you get good screen shots of new clothing, etc. without her moving all over the place.
So there you go. Have fun and let's hear some tips!
23
Unofficial Sex Sim Support / Problem with Breast Shaper tool for non US based computers
« on: March 02, 2011, 07:22:37 PM »
There was an issue with the Breast Shaper add-on for computers not based in the United States.
Please make sure you download the latest patch from the Updates page to resolve the problem.
Please make sure you download the latest patch from the Updates page to resolve the problem.
24
How to make things for Sex Sim / How to customize pubic hair
« on: March 01, 2011, 07:52:10 PM »
As of Sex Sim version 1.0h (March 2011) you can now use custom 3D pubic hair on characters instead of painting it directly onto their body texture.
The relevant lines in the XML files are:
<PubicHair>NUMBER (0 through 22)</PubicHair>
<PubicHair_Color_R>NUMBER (0 through 255)</PubicHair_Color_R>
<PubicHair_Color_G>NUMBER (0 through 255)</PubicHair_Color_G>
<PubicHair_Color_B>NUMBER (0 through 255)</PubicHair_Color_B>
The PubicHair_Color values represent RGB values, which means you have over 16 million colors to choose from for the pubic hair. Each value goes in the appropriate slot, so the red value, or R goes in the <PubicHair_Color_R> slot, and so forth.
Here's a good tool for finding a color value. Just use the numbers it gives you from the Red, Green, and Blue boxes and enter them into your XML.
For the pubic hair number, use the following chart:
Please note that if you or the user don't own the Pubic Hair Styler mod, then the pubic hair you have chosen will be converted to one of four default types. A person using your character (even yourself) will ONLY see some pubic hair styles if they own the Pubic Hair Styler from the add-ons shop. See the note under the chart for the default values.
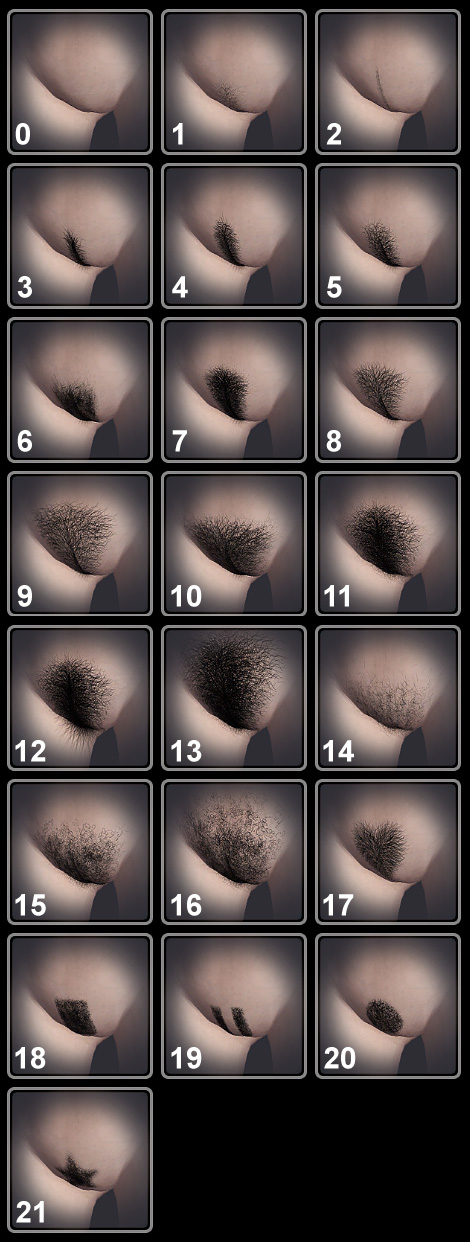
* As noted above, if the user doesn't own the Pubic Hair Styler mod, then the pubic types defined in the XML will default to the following:
pubic type 0 defaults to type 0 - "none"
pubic type 1 defaults to type 1
pubic type 2 defaults to type 1
pubic type 3 defaults to type 1
pubic type 4 defaults to type 1
pubic type 5 defaults to type 1
pubic type 6 defaults to type 6
pubic type 7 defaults to type 6
pubic type 8 defaults to type 14
pubic type 9 defaults to type 14
pubic type 10 defaults to type 14
pubic type 11 defaults to type 6
pubic type 12 defaults to type 14
pubic type 13 defaults to type 14
pubic type 14 defaults to type 14
pubic type 15 defaults to type 14
pubic type 16 defaults to type 14
pubic type 17 defaults to type 14
pubic type 18 defaults to type 6
pubic type 19 defaults to type 6
pubic type 20 defaults to type 6
pubic type 21 defaults to type 6
The relevant lines in the XML files are:
<PubicHair>NUMBER (0 through 22)</PubicHair>
<PubicHair_Color_R>NUMBER (0 through 255)</PubicHair_Color_R>
<PubicHair_Color_G>NUMBER (0 through 255)</PubicHair_Color_G>
<PubicHair_Color_B>NUMBER (0 through 255)</PubicHair_Color_B>
The PubicHair_Color values represent RGB values, which means you have over 16 million colors to choose from for the pubic hair. Each value goes in the appropriate slot, so the red value, or R goes in the <PubicHair_Color_R> slot, and so forth.
Here's a good tool for finding a color value. Just use the numbers it gives you from the Red, Green, and Blue boxes and enter them into your XML.
For the pubic hair number, use the following chart:
Please note that if you or the user don't own the Pubic Hair Styler mod, then the pubic hair you have chosen will be converted to one of four default types. A person using your character (even yourself) will ONLY see some pubic hair styles if they own the Pubic Hair Styler from the add-ons shop. See the note under the chart for the default values.
* As noted above, if the user doesn't own the Pubic Hair Styler mod, then the pubic types defined in the XML will default to the following:
pubic type 0 defaults to type 0 - "none"
pubic type 1 defaults to type 1
pubic type 2 defaults to type 1
pubic type 3 defaults to type 1
pubic type 4 defaults to type 1
pubic type 5 defaults to type 1
pubic type 6 defaults to type 6
pubic type 7 defaults to type 6
pubic type 8 defaults to type 14
pubic type 9 defaults to type 14
pubic type 10 defaults to type 14
pubic type 11 defaults to type 6
pubic type 12 defaults to type 14
pubic type 13 defaults to type 14
pubic type 14 defaults to type 14
pubic type 15 defaults to type 14
pubic type 16 defaults to type 14
pubic type 17 defaults to type 14
pubic type 18 defaults to type 6
pubic type 19 defaults to type 6
pubic type 20 defaults to type 6
pubic type 21 defaults to type 6
26
Unofficial Sex Sim Support / MOVED: Modding Questions
« on: December 16, 2010, 12:45:14 PM »
I moved this to the How to make things for Sex Sim board.
http://www.sexsim.com/forum/index.php?topic=304.0
http://www.sexsim.com/forum/index.php?topic=304.0
28
Suggestions / What would you like next?
« on: November 15, 2010, 12:26:41 AM »
We're going over some of the things to work on after we release the next update and we'd love to know what you all are most interested in from the list above. These are just some of the things we have planned for the future and all of them sound fun to make so let us know what you'd most like next.
29
How to make things for Sex Sim / How to use custom BUMP MAPS on a Sex Sim character
« on: November 03, 2010, 03:59:31 PM »
Note: The following information is out of date with the introduction of the new Character Editor but will be left here for reference. Please see this thread for more up-to-date info.
Character Bump Mapping
This tutorial will show you how to add custom bump maps to characters in Sex Sim. Please note that bump mapping is a more involved process than texturing, and you will need to download additional tools to do them.
Make sure you have read through the CHARACTER TEXTURE TUTORIAL before trying to do bump maps. This tutorial references things from that one so you'll need to be familiar with it.
What you need:
1. Photoshop is HIGHLY RECOMMENDED.
2. Unity : OPTIONAL (see "Alternate Bump Mapping Creation Method" at the bottom of this post) - this is the game engine we created Sex Sim in, and it also offers the easiest way to make bump maps for it. Unity is an amazing engine, and if you're interested in developing games it's in my opinion the best way to go right now. The beauty of it is they made it free for the basic version, so there's no cost to download and get started. We're going to use it for this tutorial, so go ahead and download Unity here and get it installed. I'll wait.
3. Unity Package with Bump Maps This is a package you'll need to import into Unity in order to follow this tutorial.
4. Base Female Bump Map Textures : This zip file contains the base female bump map textures in Photoshop format (GIMP can also load Photoshop format) if you don't have Photoshop.
Loading the Unity Project:
This part is OPTIONAL. You can also make bump maps with GIMP. Please see "Alternate Bump Mapping Creation Method" at the bottom of this post for details.
Once you get Unity installed, click on the "File" menu and choose "New Project", then save the project wherever you like. Once the new project is ready, click the "Assets" menu, then choose "Import Package" (figure 1). When the file dialog comes up, find the Unity Package file you just downloaded (the Unity Package with Bump Maps) and import it into Unity. When the window comes up asking what to import, just make sure everything is checked and hit "Import". You should now have a scene open with a Textures folder in the Unity Projects section. Click to open that folder if it's not already opened, and you should then see the textures we'll be using for this tutorial.
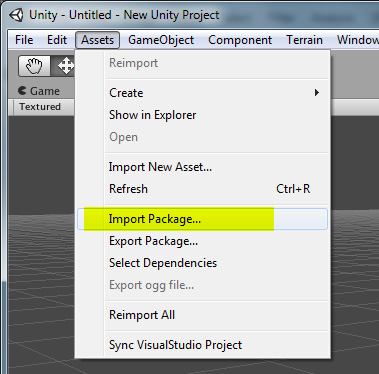
figure 1
Once the project files are loaded you won't have to do that import package part again, the files will be there from now on when you load up Unity and open the project you made.
Exporting the Bump Maps:
The bump maps included with the files I list above can be used as is in custom characters. So first, let's imagine that you're happy with the maps and you want them to use with a custom character.
Make sure you have the Unity project open, then click on the BODY bump texture in the Projects window. You should then see it appear in the Inspector Window.
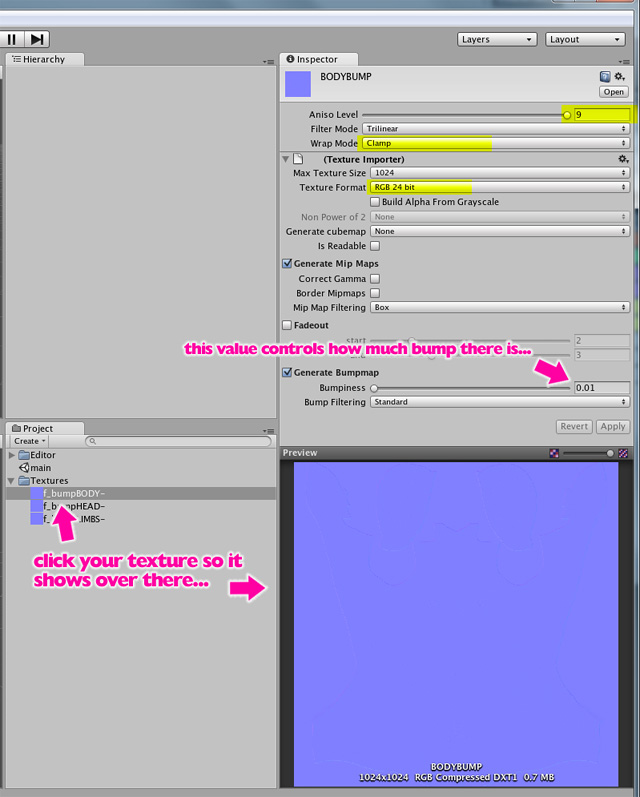
For now we're going to leave the "Bumpiness" factor set to 0.01 as that works best for a nice look in Sex Sim.
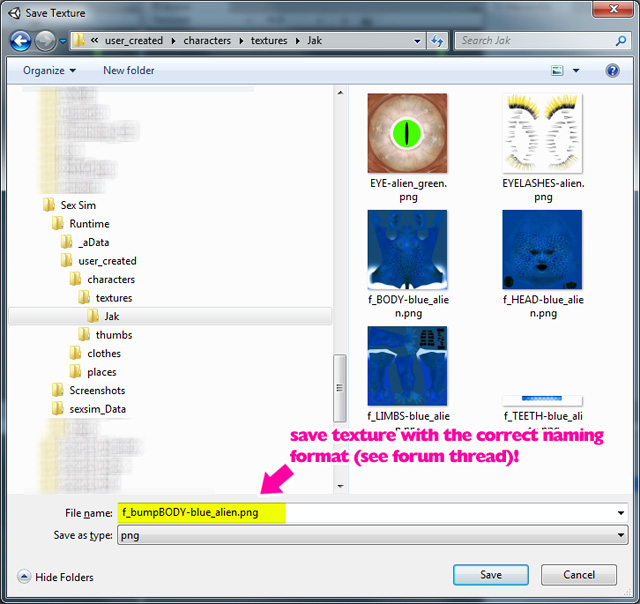
Right click on the Body bump texture and choose "Export Normalmap" (See the bottom of this post for info on this option).
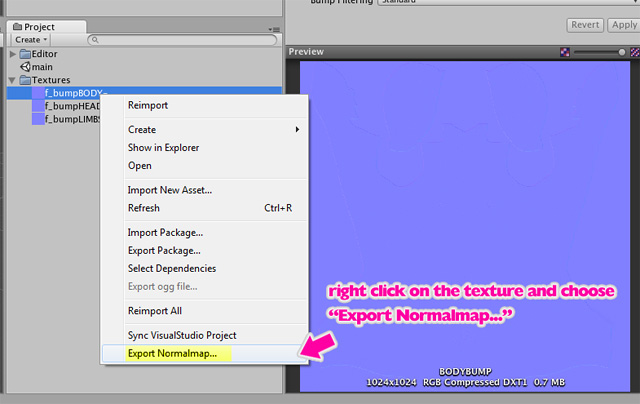
When the dialog comes up, you'll want to save the bump textures into the SAME FOLDER where you put your character textures form the first part of this tutorial (from the section titled "Saving your new textures:").
We're going to do this for all three textures in the project: BODY, HEAD, and LIMBS, so once you export the BODY texture, click the others and do the same thing.
Just like in the first tutorial, the bump maps have to follow a certain naming convention. In our tutorial we're using a "main name" of "blue_alien", so we'll use that main name in our bump map filenames as well:
f_bumpBODY-blue_alien.png
f_bumpHEAD-blue_alien.png
f_bumpLIMBS-blue_alien.png
Once you have the textures exported, you can now use them in your character.
Putting the bump map textures onto a character:
As we talked about in the first tutorial, Sex Sim uses XML files to tell it information about what textures a character uses. Please see the XML File Specs : Characters for full info about the character XML files.
Open up your XML file in your text editor and find the <BumpTex> tag. That's where we'll let Sex Sim know to use your textures.
<BumpTex>blue_alien</BumpTex>
<BumpTexSource>Jak</BumpTexSource>
As in the first tutorial, I put my name in the "Source" section so the sim knows where to find the textures, and I use the bump textures "main name" in the "BumpTex" section.
When you start the sim now and choose your custom character, she should now be using the new bump maps.
How do I make my own bump map textures?
Alright so the instructions above outline how to use the default bump map textures on your character in the sim, but that's not what you're here for is it? You want to do some cool stuff with bumps. Well you came to the right place.
Once you've got the steps above figured out, it's easy to add your own touches to the maps.
First, open up Photoshop (or GIMP) and then open one of the bump map files from the project folder where your Unity project is. You can find the files in the path \New Unity Project\Assets\Textures\. Once you find them, let's open up the BODY map.
The first thing you'll notice is that the texture is greyscale and not blue like it shows in Unity. That's exactly how it should be. When Unity loads the textures it automatically makes them blue since we checked the "generate bump map" checkbox in our Unity project. When you work on the bump maps in Photoshop you'll be working in greyscale.
A greyscale bump map uses a simple concept of brightness values. The brighter a section is, the higher it will be when bumped, and the darker it is the lower it will be. So pure white will be the highest points on the map and pure black will be the lowest. Since we don't want any extreme values on our default skin bumps they are more in the muted grey range.
Basically you're on your own as far as what you want to add to your bump maps, but play around and see what happens. Here's an example of using pure white to paint a design on the girl, and how it ends up looking in the sim:
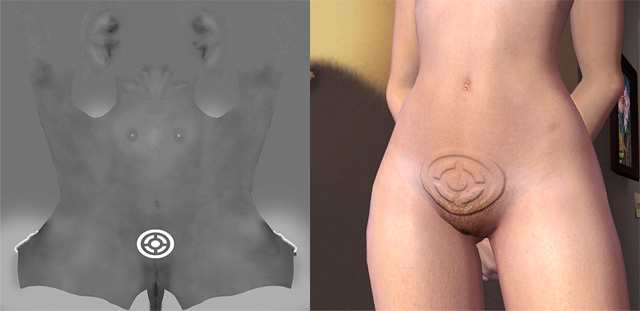
So you can see that there's a lot that can be done with bump maps, from lizard skin to wrinkles, to who knows what.
Getting your customized bump maps into Unity:
Ok so you played around and painted some things on a bump map. All you have to do is save it in Photoshop or GIMP, go back to Unity, and it will automatically reload the texture. Then just follow the section from above about exporting the bump maps, and that's it. Same thing.
Again make sure you have read the first tutorial as there's more info in that about what to do with the XML files and all that.
Oh yeah, the file listed up top named "Base Female Bump Map Textures" has the original bump maps in it in case you need them to revert back to defaults or whatever.
Have fun!
Alternate Bump Mapping Creation Method
Using the GIMP Normal Map Filter:
Thanks to Isotemod for pointing out the GIMP Normal Map filter. If you don't feel like messing about with Unity then this method will also work.
You can download the plugin here, and then it needs to be installed to your GIMP plugins folder. After that, restart GIMP and you should find the plugin under Filters\Map\Normalmap.
Open up the greyscale bump image and apply the filter. I've experimented with it and find that the following settings are as close as I can get it to the way Unity makes the maps:
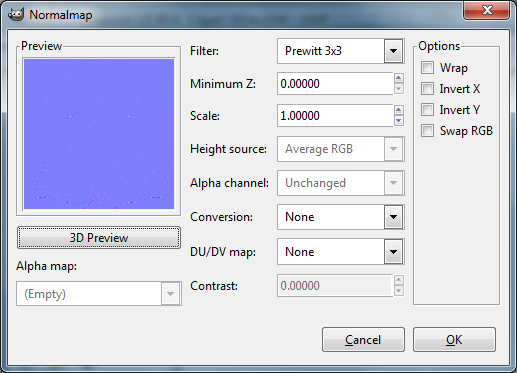
So you apply the filter and then save the image directly into your texture folder for the character.
Doing it this way means you can skip all the exporting and all that that goes along with the Unity technique, but (based on my testing at least) at the expense of some extra detail and smoothness of the resulting bump maps. The choice is up to you, but thanks again to Isotemod for the heads-up.
ADDED 2/17/2011: Installing the "Export to Normal Map" script into Unity
If you've chosen to use the Unity method, then you'll need to install a special "Export to Normal Map" script into Unity in order to have that option.
To do that,
1. Go to this page: http://www.unifycommunity.com/wiki/index.php?title=ExportNormalmap
2. Copy all of the text inside the box on that page (starting with "@MenuItem ("Assets/Export Normalmap...")" and ending with the final curly bracket.
3. Paste that text into a text file (using Notepad or TextPad or whatever), and then save it as filename "ExportNormalmap.js" into your Unity project's "Assets\Editor" folder. If there isn't already an "Editor" folder in your Assets directory, then make one now.
4. Start Unity and the project, and you should now have the "Export Normalmap" option as shown above in this tutorial.
Character Bump Mapping
This tutorial will show you how to add custom bump maps to characters in Sex Sim. Please note that bump mapping is a more involved process than texturing, and you will need to download additional tools to do them.
Make sure you have read through the CHARACTER TEXTURE TUTORIAL before trying to do bump maps. This tutorial references things from that one so you'll need to be familiar with it.
What you need:
1. Photoshop is HIGHLY RECOMMENDED.
2. Unity : OPTIONAL (see "Alternate Bump Mapping Creation Method" at the bottom of this post) - this is the game engine we created Sex Sim in, and it also offers the easiest way to make bump maps for it. Unity is an amazing engine, and if you're interested in developing games it's in my opinion the best way to go right now. The beauty of it is they made it free for the basic version, so there's no cost to download and get started. We're going to use it for this tutorial, so go ahead and download Unity here and get it installed. I'll wait.
3. Unity Package with Bump Maps This is a package you'll need to import into Unity in order to follow this tutorial.
4. Base Female Bump Map Textures : This zip file contains the base female bump map textures in Photoshop format (GIMP can also load Photoshop format) if you don't have Photoshop.
Loading the Unity Project:
This part is OPTIONAL. You can also make bump maps with GIMP. Please see "Alternate Bump Mapping Creation Method" at the bottom of this post for details.
Once you get Unity installed, click on the "File" menu and choose "New Project", then save the project wherever you like. Once the new project is ready, click the "Assets" menu, then choose "Import Package" (figure 1). When the file dialog comes up, find the Unity Package file you just downloaded (the Unity Package with Bump Maps) and import it into Unity. When the window comes up asking what to import, just make sure everything is checked and hit "Import". You should now have a scene open with a Textures folder in the Unity Projects section. Click to open that folder if it's not already opened, and you should then see the textures we'll be using for this tutorial.
figure 1
Once the project files are loaded you won't have to do that import package part again, the files will be there from now on when you load up Unity and open the project you made.
Exporting the Bump Maps:
The bump maps included with the files I list above can be used as is in custom characters. So first, let's imagine that you're happy with the maps and you want them to use with a custom character.
Make sure you have the Unity project open, then click on the BODY bump texture in the Projects window. You should then see it appear in the Inspector Window.
For now we're going to leave the "Bumpiness" factor set to 0.01 as that works best for a nice look in Sex Sim.
Right click on the Body bump texture and choose "Export Normalmap" (See the bottom of this post for info on this option).
When the dialog comes up, you'll want to save the bump textures into the SAME FOLDER where you put your character textures form the first part of this tutorial (from the section titled "Saving your new textures:").
We're going to do this for all three textures in the project: BODY, HEAD, and LIMBS, so once you export the BODY texture, click the others and do the same thing.
Just like in the first tutorial, the bump maps have to follow a certain naming convention. In our tutorial we're using a "main name" of "blue_alien", so we'll use that main name in our bump map filenames as well:
f_bumpBODY-blue_alien.png
f_bumpHEAD-blue_alien.png
f_bumpLIMBS-blue_alien.png
Once you have the textures exported, you can now use them in your character.
Putting the bump map textures onto a character:
As we talked about in the first tutorial, Sex Sim uses XML files to tell it information about what textures a character uses. Please see the XML File Specs : Characters for full info about the character XML files.
Open up your XML file in your text editor and find the <BumpTex> tag. That's where we'll let Sex Sim know to use your textures.
<BumpTex>blue_alien</BumpTex>
<BumpTexSource>Jak</BumpTexSource>
As in the first tutorial, I put my name in the "Source" section so the sim knows where to find the textures, and I use the bump textures "main name" in the "BumpTex" section.
When you start the sim now and choose your custom character, she should now be using the new bump maps.
How do I make my own bump map textures?
Alright so the instructions above outline how to use the default bump map textures on your character in the sim, but that's not what you're here for is it? You want to do some cool stuff with bumps. Well you came to the right place.
Once you've got the steps above figured out, it's easy to add your own touches to the maps.
First, open up Photoshop (or GIMP) and then open one of the bump map files from the project folder where your Unity project is. You can find the files in the path \New Unity Project\Assets\Textures\. Once you find them, let's open up the BODY map.
The first thing you'll notice is that the texture is greyscale and not blue like it shows in Unity. That's exactly how it should be. When Unity loads the textures it automatically makes them blue since we checked the "generate bump map" checkbox in our Unity project. When you work on the bump maps in Photoshop you'll be working in greyscale.
A greyscale bump map uses a simple concept of brightness values. The brighter a section is, the higher it will be when bumped, and the darker it is the lower it will be. So pure white will be the highest points on the map and pure black will be the lowest. Since we don't want any extreme values on our default skin bumps they are more in the muted grey range.
Basically you're on your own as far as what you want to add to your bump maps, but play around and see what happens. Here's an example of using pure white to paint a design on the girl, and how it ends up looking in the sim:
So you can see that there's a lot that can be done with bump maps, from lizard skin to wrinkles, to who knows what.
Getting your customized bump maps into Unity:
Ok so you played around and painted some things on a bump map. All you have to do is save it in Photoshop or GIMP, go back to Unity, and it will automatically reload the texture. Then just follow the section from above about exporting the bump maps, and that's it. Same thing.
Again make sure you have read the first tutorial as there's more info in that about what to do with the XML files and all that.
Oh yeah, the file listed up top named "Base Female Bump Map Textures" has the original bump maps in it in case you need them to revert back to defaults or whatever.
Have fun!
Alternate Bump Mapping Creation Method
Using the GIMP Normal Map Filter:
Thanks to Isotemod for pointing out the GIMP Normal Map filter. If you don't feel like messing about with Unity then this method will also work.
You can download the plugin here, and then it needs to be installed to your GIMP plugins folder. After that, restart GIMP and you should find the plugin under Filters\Map\Normalmap.
Open up the greyscale bump image and apply the filter. I've experimented with it and find that the following settings are as close as I can get it to the way Unity makes the maps:
So you apply the filter and then save the image directly into your texture folder for the character.
Doing it this way means you can skip all the exporting and all that that goes along with the Unity technique, but (based on my testing at least) at the expense of some extra detail and smoothness of the resulting bump maps. The choice is up to you, but thanks again to Isotemod for the heads-up.
ADDED 2/17/2011: Installing the "Export to Normal Map" script into Unity
If you've chosen to use the Unity method, then you'll need to install a special "Export to Normal Map" script into Unity in order to have that option.
To do that,
1. Go to this page: http://www.unifycommunity.com/wiki/index.php?title=ExportNormalmap
2. Copy all of the text inside the box on that page (starting with "@MenuItem ("Assets/Export Normalmap...")" and ending with the final curly bracket.
3. Paste that text into a text file (using Notepad or TextPad or whatever), and then save it as filename "ExportNormalmap.js" into your Unity project's "Assets\Editor" folder. If there isn't already an "Editor" folder in your Assets directory, then make one now.
4. Start Unity and the project, and you should now have the "Export Normalmap" option as shown above in this tutorial.
30
Unofficial Sex Sim Support / Installer asking for second disk?
« on: November 01, 2010, 01:18:11 PM »
If you are having problems downloading the installer or it asking for a second disk, it is because the file is not downloading all the way to your computer.
To solve this issue, please delete the file you downloaded, then get yourself a download manager which will help with this file and others. After you get the download manager installed then try downloading Sex Sim again. The download manager will allow the file to download properly.
Here are some links to popular download managers:
http://www.speedbit.com/
http://getright.com/
http://www.freedownloadmanager.org/
If you continue to have troubles please let me know.
SMF spam blocked by CleanTalk