Note: The following information is out of date with the introduction of the new Character Editor but will be left here for reference. Please see this thread for more up-to-date info.Character Bump MappingThis tutorial will show you how to add custom bump maps to characters in Sex Sim. Please note that bump mapping is a more involved process than texturing, and you will need to download additional tools to do them.
Make sure you have read through the
CHARACTER TEXTURE TUTORIAL before trying to do bump maps. This tutorial references things from that one so you'll need to be familiar with it.
What you need:1. Photoshop is HIGHLY RECOMMENDED.
2. Unity : OPTIONAL (see "Alternate Bump Mapping Creation Method" at the bottom of this post) - this is the game engine we created Sex Sim in, and it also offers the easiest way to make bump maps for it. Unity is an amazing engine, and if you're interested in developing games it's in my opinion the best way to go right now. The beauty of it is they made it
free for the basic version, so there's no cost to download and get started. We're going to use it for this tutorial, so go ahead and
download Unity here and get it installed. I'll wait.
3. Unity Package with Bump Maps This is a package you'll need to import into Unity in order to follow this tutorial.
4. Base Female Bump Map Textures : This zip file contains the base female bump map textures in Photoshop format (GIMP can also load Photoshop format) if you don't have Photoshop.
Loading the Unity Project:This part is
OPTIONAL. You can also make bump maps with GIMP. Please see "Alternate Bump Mapping Creation Method" at the bottom of this post for details.
Once you get Unity installed, click on the "File" menu and choose "
New Project", then save the project wherever you like. Once the new project is ready, click the "Assets" menu, then choose "
Import Package" (figure 1). When the file dialog comes up, find the Unity Package file you just downloaded (the Unity Package with Bump Maps) and import it into Unity. When the window comes up asking what to import, just make sure everything is checked and hit "
Import". You should now have a scene open with a Textures folder in the Unity Projects section. Click to open that folder if it's not already opened, and you should then see the textures we'll be using for this tutorial.
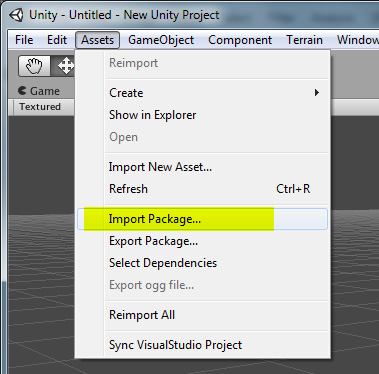 figure 1
Once the project files are loaded you won't have to do that import package part again, the files will be there from now on when you load up Unity and open the project you made.
Exporting the Bump Maps:The bump maps included with the files I list above can be used as is in custom characters. So first, let's imagine that you're happy with the maps and you want them to use with a custom character.
Make sure you have the Unity project open, then click on the BODY bump texture in the Projects window. You should then see it appear in the Inspector Window.
For now we're going to leave the "Bumpiness" factor set to 0.01 as that works best for a nice look in Sex Sim.
Right click on the Body bump texture and choose "
Export Normalmap" (See the bottom of this post for info on this option).
When the dialog comes up, you'll want to save the bump textures into the SAME FOLDER where you put your character textures form the first part of this tutorial (from the section titled "Saving your new textures:").
We're going to do this for all three textures in the project: BODY, HEAD, and LIMBS, so once you export the BODY texture, click the others and do the same thing.
Just like in the
first tutorial, the bump maps have to follow a certain naming convention. In our tutorial we're using a "main name" of "blue_alien", so we'll use that main name in our bump map filenames as well:
f_bumpBODY-blue_alien.png
f_bumpHEAD-blue_alien.png
f_bumpLIMBS-blue_alien.pngOnce you have the textures exported, you can now use them in your character.
Putting the bump map textures onto a character:As we talked about in the
first tutorial, Sex Sim uses XML files to tell it information about what textures a character uses. Please see the
XML File Specs : Characters for full info about the character XML files.
Open up your XML file in your text editor and find the
<BumpTex> tag. That's where we'll let Sex Sim know to use your textures.
<BumpTex>blue_alien</BumpTex>
<BumpTexSource>Jak</BumpTexSource>As in the
first tutorial, I put my name in the "Source" section so the sim knows where to find the textures, and I use the bump textures "main name" in the "BumpTex" section.
When you start the sim now and choose your custom character, she should now be using the new bump maps.
How do I make my own bump map textures?Alright so the instructions above outline how to use the default bump map textures on your character in the sim, but that's not what you're here for is it? You want to do some cool stuff with bumps. Well you came to the right place.
Once you've got the steps above figured out, it's easy to add your own touches to the maps.
First, open up Photoshop (or GIMP) and then open one of the bump map files from the project folder where your Unity project is. You can find the files in the path
\New Unity Project\Assets\Textures\. Once you find them, let's open up the BODY map.
The first thing you'll notice is that the texture is greyscale and not blue like it shows in Unity. That's exactly how it should be. When Unity loads the textures it automatically makes them blue since we checked the "generate bump map" checkbox in our Unity project. When you work on the bump maps in Photoshop you'll be working in greyscale.
A greyscale bump map uses a simple concept of brightness values. The brighter a section is, the higher it will be when bumped, and the darker it is the lower it will be. So pure white will be the highest points on the map and pure black will be the lowest. Since we don't want any extreme values on our default skin bumps they are more in the muted grey range.
Basically you're on your own as far as what you want to add to your bump maps, but play around and see what happens. Here's an example of using pure white to paint a design on the girl, and how it ends up looking in the sim:
So you can see that there's a lot that can be done with bump maps, from lizard skin to wrinkles, to who knows what.
Getting your customized bump maps into Unity:Ok so you played around and painted some things on a bump map. All you have to do is save it in Photoshop or GIMP, go back to Unity, and it will automatically reload the texture. Then just follow the section from above about exporting the bump maps, and that's it. Same thing.
Again make sure you have read the
first tutorial as there's more info in that about what to do with the XML files and all that.
Oh yeah, the file listed up top named "
Base Female Bump Map Textures" has the original bump maps in it in case you need them to revert back to defaults or whatever.
Have fun!
Alternate Bump Mapping Creation MethodUsing the GIMP Normal Map Filter:Thanks to Isotemod for pointing out the GIMP Normal Map filter. If you don't feel like messing about with Unity then this method will also work.
You can
download the plugin here, and then it needs to be installed to your GIMP plugins folder. After that, restart GIMP and you should find the plugin under
Filters\Map\Normalmap.
Open up the greyscale bump image and apply the filter. I've experimented with it and find that the following settings are as close as I can get it to the way Unity makes the maps:
So you apply the filter and then save the image directly into your texture folder for the character.
Doing it this way means you can skip all the exporting and all that that goes along with the Unity technique, but (based on my testing at least) at the expense of some extra detail and smoothness of the resulting bump maps. The choice is up to you, but thanks again to Isotemod for the heads-up.
ADDED 2/17/2011: Installing the "Export to Normal Map" script into UnityIf you've chosen to use the Unity method, then you'll need to install a special "Export to Normal Map" script into Unity in order to have that option.
To do that,
1. Go to this page:
http://www.unifycommunity.com/wiki/index.php?title=ExportNormalmap2. Copy all of the text inside the box on that page (starting with "@MenuItem ("Assets/Export Normalmap...")" and ending with the final curly bracket.
3. Paste that text into a text file (using Notepad or TextPad or whatever), and then save it as filename "ExportNormalmap.js" into your Unity project's "Assets\Editor" folder. If there isn't already an "Editor" folder in your Assets directory, then make one now.
4. Start Unity and the project, and you should now have the "Export Normalmap" option as shown above in this tutorial.
